How can I build my own website?
Can I create a website by myself?
Can you just make a website for free?
Yes, you can! You can make a website for free, but there are limitations. In this tutorial you will learn step by step how to make a website, not for free, but cheap.
There are many ways to make a website. A website can be build with a page builder, on an online platform, with a WYSIWYG editor, by coding or using a CMS (Content Management System).
There are also many kinds of websites, such as: blogs, presentation websites, landing pages, forums, e-commerce websites, and each one having their own purpose.
How to make a website
You can make a website on free platforms or with free page builders like: Blogger (blogspot), Google Sites, WordPress.com, Wix, Weebly, Squarespace, etc. If you want to make a blog for free you can try them out, but all of these are very limited in customization, control and features.
To create a website from scratch by coding you need to know at least HTML, CSS, maybe some JavaScript and it takes time to develop. And if you want to make it dynamic and you don’t build just a static HTML landing page, PHP & MySQL is also required. What about making the website responsive… So, this is not at all a fast way to do it.
The other way to make a website is using an open-source CMS. There are many content management systems like: WordPress, Joomla, Drupal. For online stores we can use any of the above together with their specific modules or plugins, or use a CMS built for e-commerce, such as: PrestaShop, OpenCart, osCommerce, Magento and many more.
In this step-by-step tutorial we will focus on creating a website with WordPress, with your own hosted domain. This is the most cheapest and recommended way to create a website today.
Basically the only expense we have is the website hosting – the first domain being free for a year when creating an account with one of the recommended hosting companies.
Table of contents
1. What is WordPress
WordPress is a free open-source content management system and the most popular tool used to build websites and blogs.
WordPress started in 2003 and was originally designed for blogs.
Maintained by a large number of developers and designers, WordPress has grown significantly over time, gaining new features and functionality.
Over a third of the websites on the Internet are made with WordPress.
2. Why we build the site with wordpress
WordPress is open-source, it’s free, it’s easy to use, it’s user friendly, it’s SEO friendly, it’s highly customizable, and it’s also secure.
With WordPress you can create any kind of website you want. In fact, you can build blogs, portfolios, presentation websites, landing pages, business websites, membership sites, forums, e-commerce stores and so on.
On the other hand, it is constantly being improved and new features are frequently added. There are lots of themes and plugins to choose from, to customize the look of your site and extend its functionality.
WordPress is actually one of the top CMS platforms and one of the easiest CMS to use.
3. Choosing a web host with free domain
Let’s see what web hosting options we have for our WordPress website, that give us a free domain when creating an account.
Here you can find the best shared hosting offers with free domain included, the first 3 being the ones recommended also by WordPress.
- BlueHost – from $2.95/month
- Hostinger – $2.59/ month (the plan with free domain)
- DreamHost – from $2.95/ month
- HostGator – from $2.75/ month
- GreenGeeks – from $2.95/ month
Another way to get a good price overall would be to register the domains separately with GoDaddy or NameCheap, and then host them with another chosen hosting company. Or, if you already own a domain, you can choose a hosting offer maybe better than the ones with free domain included mentioned above. But we leave these aspects for another time.
Web Hosting Tips & Advices
To be considered before purchasing the web hosting service
- If your budget allows, choose a 12-month or longer period. This way, the monthly price is lower and much more profitable in the long run.
- Carefully check the pre-selected options, as many of them may add extra cost to the total price.
- It is recommended that the option to hide and protect the owner’s information be checked. This is generally for a fee, so it’s up to you whether you check it or not.
4. Setting up the hosting account for our website
Below are some video tutorials on how to register with the hosting companies listed above. Each video includes creating an account, choosing a domain, and installing WordPress from the admin interface.
4.1. Set up domain and hosting with BlueHost
4.2. Set up domain and hosting on Hostinger
4.3. Set up domain and hosting on DreamHost
4.4. Set up domain and hosting on HostGator
4.5. Set up domain and hosting on GreenGeeks
There are other ways to install WordPress on the server, like uploading the whole finished website from local dev environment or unpacking the package on specific folder and install it manually. But those methods are more advanced and, as the purpose of this tutorial is to make a website fast, are not fast ways to do it, especially for a beginner.
5. Setting up and configuring WordPress
Now, that we have our domain, hosting and WordPress installed on the server, let’s continue with the next step and set up the most basic settings.
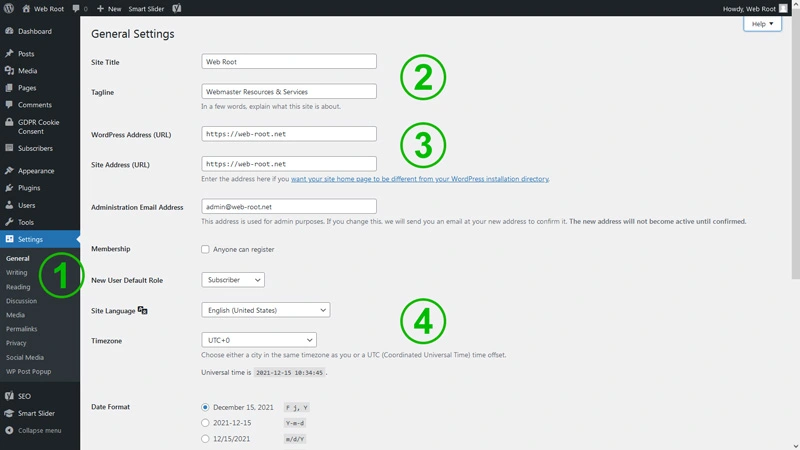
WordPress General Settings
In the WordPress admin, go and click on Settings -> General (or just Settings, to be faster).
Here you will set up your website title/name and tagline. The site name will appear in the header as logo. Tagline is a short text that will generally appear under the site title. Both can be replaced later with your logo. Beside that, the site title and tagline will define the meta tag of webite’s homepage.
The site URL must start with https. If you did not enable SSL security when creating your web hosting account, you will need to enable it and change the site URL here: http -> https.
After this change you will have to log in to WordPress again, changing the site address in the browser with the secure one.
Choose the language in which the site will be displayed to the visitors, the timezone and how the date/time will display.
Click “Save Changes” and let’s move on.
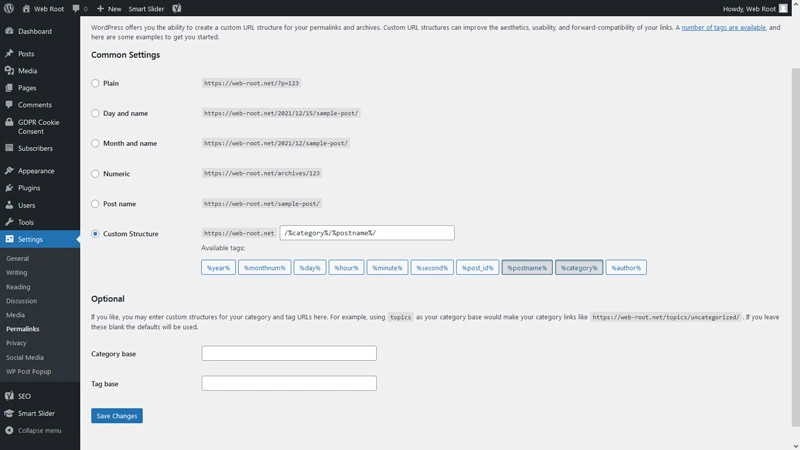
WordPress Permalinks Settings
Now, go to Settings -> Permalinks and choose the way the URL will look in the address bar. Making the URLs of your website user-friendly is very important for SEO purposes.
You can display only the post name slug by selecting “Post name” or you can add the post category before (like in the image above). These two link structures are the most used and, in fact, the ones recommended for SEO.
After choosing your preferred link structure, click “Save Changes” and let’s continue with some settings in our Profile.
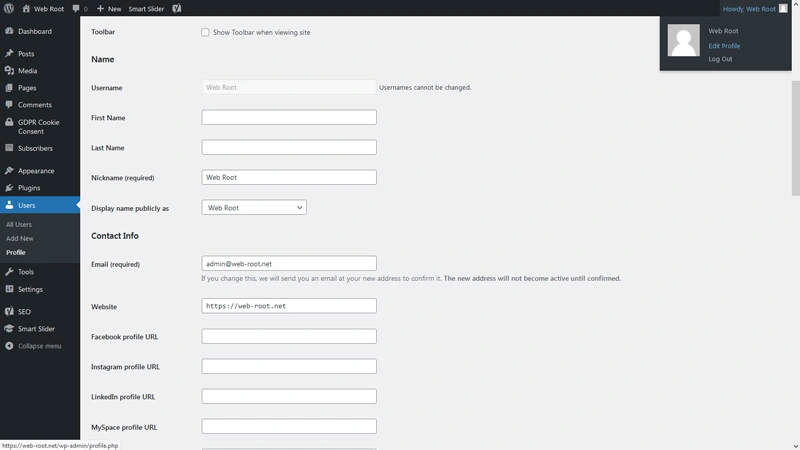
WordPress Profile Settings
To access the profile settings go to the top-right of the admin page and click on “Edit Profile” from the drop-down menu.
Here we are interested in setting up a Nickname that will show up to our visitors and the admin language (this option will appear if your website is in other language than english).
And, for now, that’s it about the settings. Let’s move on to build our website.
6. Building the website
Next, we will see how to make posts, pages, create a menu, how to add elements to the sidebar, where and how to chose a design and extend the website functionality.
6.1. Creating the basic elements for the website
Now, using the default WordPress interface, we will start adding the main elements to the website.
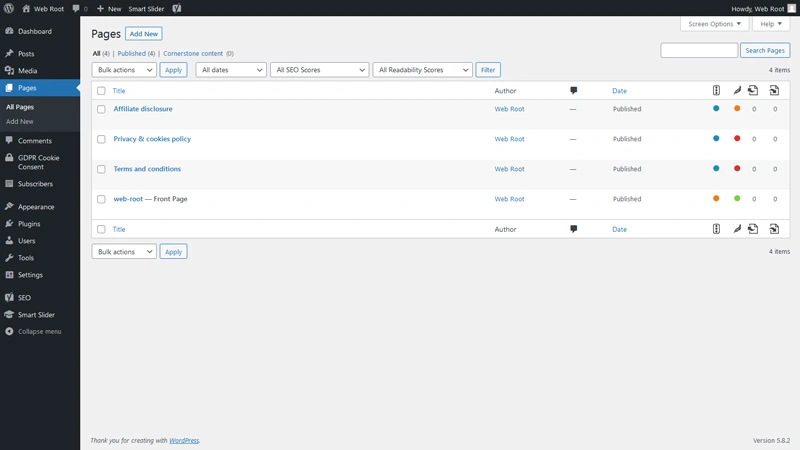
Creating basic website pages
We will go now, in the left menu of WordPress, to Pages and delete all default/demo pages from there. The we start creating the following new pages: Home, About Us, Contact. We can also create here the Terms and/or Policies pages for our website.
To add aa page, just click Add New from the top of the page, write the page name in the “Add title” field and click Publish button found on the right. You can also write the content if you want, or you can do it later. We create the pages now to add them later in the menu.
In the same way we can create blog posts, by going to Posts in the WordPress menu. Post categories and tags can be created from Posts -> Categories.
From the WP menu select Settings -> Reading and let’s separate the hompage location and blog posts. Select “A static page” and from Homepage dropdown form chose the page named “Home” created earlier. Leave the Posts page as it is for now, and click Save Changes at the bottom of the page.
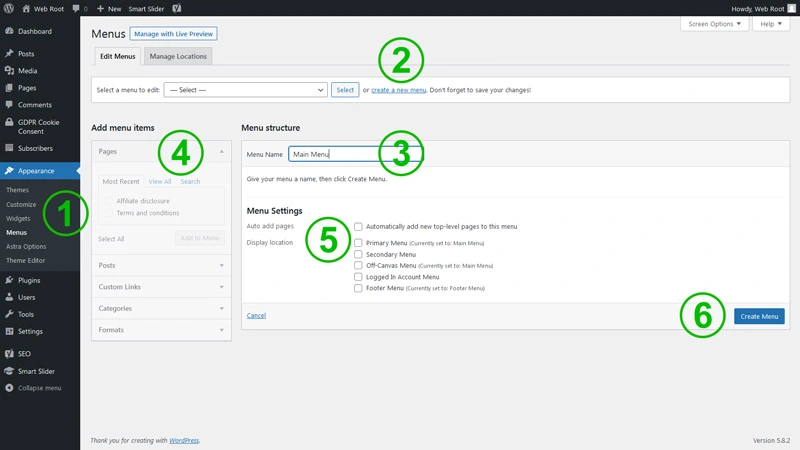
Creating the website header menu
Let’s create the main menu for the website. Go to Appearance -> Menus, click “create a new menu” link and give it a name (eg. Main Menu or Top Menu).
On left side menu items, on from Pages section select “View All“, check the pages and add them to the menu. At the bottom, in Menu Settings section check “Primary Menu” and click Create Menu button.
Now the menu should show up in the header of our website.
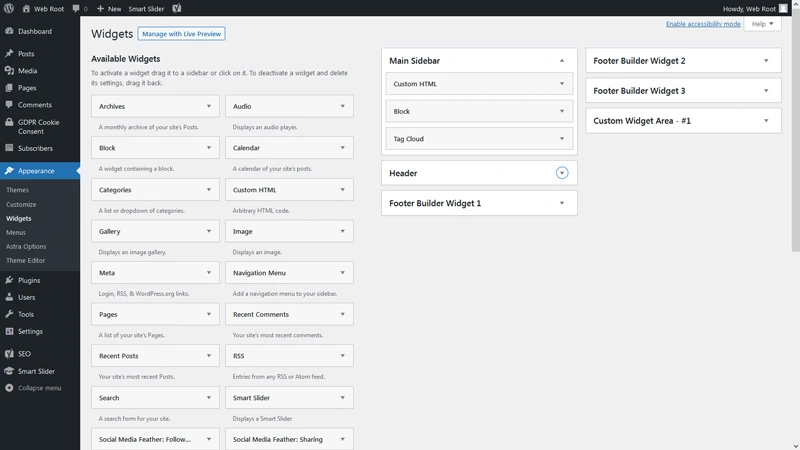
Adding sidebar widgets
If we go to Appearance -> Widgets we will see two columns of available widgets on the left-half. On the right-half of the page we have the location of those widgets/elements. The widgets can be added to sidebars, header and footer.
You can add widgets by drag-and-drop or by clicking on the arrow from the right side of each widget and select the location you want that widget to appear.
Because themes and page builders can have custom widgets and widgets areas, we will leave them as they are. Later you can customize your sidebars and widget locations from here or from the installed theme options.
6.2. Making the website design and functionality
After so many settings and configurations, it’s time to take care of the design and functionality of the website.
Next we will see how to select and install a free theme and some necessary plugins for the site.
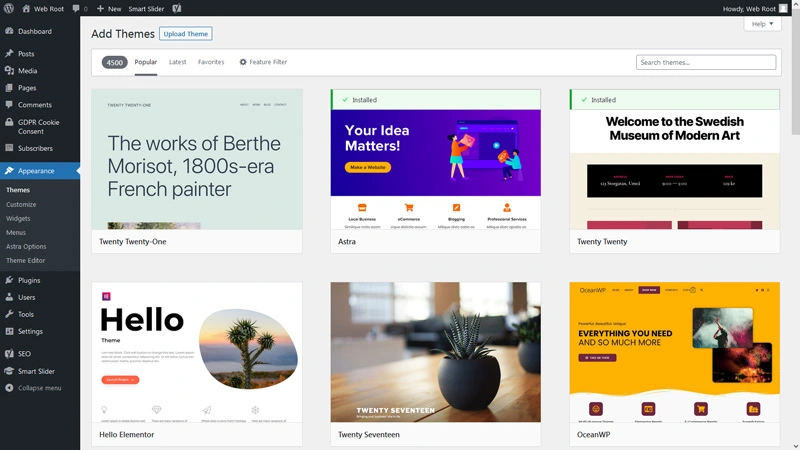
Installing a free WordPress theme
To search for a free theme in WordPres we will go to Appearance -> Themes and click on the Add New button at the top of the page. Here we can search or select from thousands of themes, a free one that we like, which we then install and activate.
Among the most recommended and popular free themes are: Astra, Neve, OceanWP, Hestia, and Blocksy. You can choose one of these, or you can look for another theme that best suits your project.
Each theme has a free and paid version. In fact, you can upload a purchased theme using the Upload Theme button at the top of the page. The choice is in everyone’s preferences and budget.
Configuring and setting themes may differ from one to another. For this reason we will not go into details. Instead, when we have tutorials on using these topics, we will put links to them in this post.
Installing some required plugins
Lately, WordPress themes go hand in hand with page builders, and most sites today are built using page builders. They use the drag-and-drop system and are easy to use. So, below we will mention some of the most used page builders for WordPress.
Among the most popular and best free page builders are: Elementor, Visual Composer, Beaver Builder, Themify, Brizy, SiteOrigin. Another very popular WordPress page builder is Divi, but this is a paid one. Overall, the best and most used page builder is Elementor.
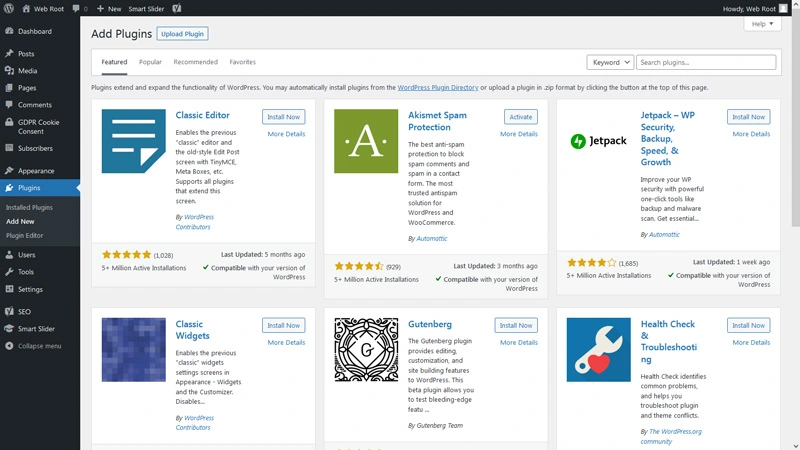
Like plugins, page builders are installed from Plugins -> Add New.
Regarding the plugins, some come installed with WordPress – these being integrated by the hosting company, and others can be bundled with the theme. There are all kinds of plugins, for all requirements, needs and for all tastes. There are plugins for functionality, design, security, optimization, analytics, performance, emails, galleries, and so on …
Some of the most popular and recommended plugins for you to check out would be:
- WPForms – to create different kind of forms, including contact form for the contact page;
- MonsterInsights – the best Google Analytics plugin;
- Yoast SEO – WordPress plugin for SEO;
- Smart Slider 3 – homepage slider
- GDPR Cookie Consent
- Social Media Feather – social media sharing and following buttons and icons
- Akismet – Anti-Spam
Well, this is kind of a long tutorial… For the sake of making a website fast and simple, let’s sumarize:
- Chose a domain name and create a hosting account;
- Install WordPress using the Quick Install feature;
- Set up the basic WordPress settings;
- Add the basic pages, the main menu and sidebar elements;
- Install a free WordPress theme and adapt it to your needs;
- Install a page builder and required plugins;
- Have Fun! 🙂